Wednesday, April 06, 2005

Ready for Sleeves

Here is my little crescent of knitting - ready to separate into body and sleeves.


I'm using smaller yarn and needles than the pattern calls for, so I knit until the armhole depth was correct to the size I am making. Now I will get a couple pieces of string to use the provisional cast-on for the underarms. When I am ready to sew or graft the underarm together this will mean I can do it without picking up stitches so there won't be a ridge.


Without the sleeve stitches, I had to switch back to a smaller needle. Now I am going to work around on the body stitches until this ball of yarn runs out :-)


I often find a long wonky piece of yarn where I have started (and ended) casting on stitches. The one in the photo is an inch long so I am going to put a twist in it and put that loop on the left needle. Next I will knit it together with the first stitch, decreasing it away.

Sunday, April 03, 2005

It's Not to Late to Join the Fun!

Several people have asked if it is too late to join our KnitAlong and the answer is - Welcome!

Some people have not started yet, some of us are poking along, and a few speedy folk are already finished - and some are starting their second sweater - WOW.

If you don't see you name on the list to the right, let me know and I will add you.

Remember - this is not a competition - life has a way of surprising us with one of two things - more time or less time. Hopefully we will all learn something along the path :-)

Monday, March 28, 2005

How Are We Doing?

Who has finished?
Who hasn't started yet?
Who has questions?

If you can't post to the comments because you are not a member of Blogger, let me know and I will make you a member of this blog :-)

Answers to the comments:
Kellie asked about the part of the pattern where you put stitches on hold - this is where the sleeves and the body become seoarate tubes. You need to make sure the underarm depth is comfortable at this point. It may help to measure a garment that fits the way you want this one to fit.

Smidget asked about the overall length - the pattern will specify a total length for your garment - remember, YOU are the architect. Make it as short or as long as YOU want :-)

She also asked if you have to do the hem treatment specified in the pattern because she does not like rolled hems. Once again - YOU get to decide :-) You can do ribbing or seed stitch or any other stitch that doesn't roll if you don't want a rolled edge.

Judi says her sweater is too small and thinks she should go up a size - if it isn't too late, instead of going up a size, you could just keep increasing (unless it is LOTS too small :-) If you keep increasing, try it on again in a few inches and see if it is the size you want. Your numbers will not match the pattern at this point as far as how many stitches are between the markers, but you can see which part is which when you are ready to separate the body from the sleeves. Better than starting over :-)

Anon. asked about a color jog in the middle of her neckline - feel free to move the start of row over to someplace less obvious like the side of the neck. Yes you will have a little section of ribbing that has one more row than the rest but, I promise you, the Knitting Police will not fine/find you. And you will like the look much better!

Steph asked how we have so much time to knit - my answer is No Kids, No Pets, and a well-trained husband :-) Plus I watch TV every night - prime knitting time.

Anon. asked about sleeve decreases because she wants to make her sleeves longer. The pattern is telling you to decrease every 6th(5th,5th,4th,3rd) round (whichever size you are doing) and then says to space them further apart to lengthen the sleeves. In other words, if you are doing the decreases every 5th row, do them every sixth or seventh row and you will have more rows between decreases which will add rows to the length of your sleeve. I have thin arms and like really long sleeves so I usually do the decreases as the pattern specifies and then just add length at the end.

Friday, March 18, 2005

The Magic of Short Rows

Short Rows are used to create dimensional knitting - it can add either curves or depth to flat knitting. They are not usually included in patterns because every body needs them in a different place. You may or may not choose to add them to your sweater - but read along and decide for yourself :-)

The human figure is not flat, even though our clothing often is - to shape clothing and make it more flattering (or just plain more comfortable), short rows - just like darts in the sewing world - can be used to add roundness for the bust, stomach, and upper back of a garment while maintaining the same distance at the sides. In other words, a piece might have 20 rows at the edges and 30 rows in the middle - Huh?

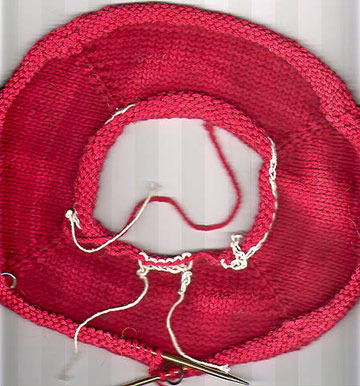
This photo has three sets of short rows:

The are 18 MORE rows in the center than on the sides, causing it to arch. See how we get short row heels on socks - we knit a little pouch like this for the base of the heel. This is only one of many shapes you can create with short rows.

The Short Row Exercise

I really want you to do this little sample so you will understand short rows - it won't take long - I promise :-)

With smooth yarn and appropriate needles - my samples are done with dishcloth cotton - cast on twenty stitches.

1. knit across the row - 20 stitches. Turn and

2. purl across the row - 20 stitches. Turn and

3. knit 18 stitches. Stop - breath - you have two stitches left unknitted. They will be staying right where they are.

4. Turn your knitting around so you are holding it facing the purl side. There are two stitches on your right needle and 18 on the left. The little gap between the right and left needle is where a hole "may" develop as you work short rows. This little opening is what people are trying to prevent by wrapping or using yarn overs while short rowing. We are not going to worry about it - this is my We Don't Need No Stinkin' Wraps Method of short rowing. So - slip the first stitch purlwise - tighten the yarn around the neck of this stitch as much as you can. Knit the next stitch. Stop here and look at your work from the front (knit) side.


The picture shows the two unworked stitches on the left, then the little gap, then the slipped stitch, then a knit stitch. Flip back to the purl side (we were just visiting the front, not doing anything.) Purl 14 stitches - stop. You should have two stitches remaining on the left needle. They will be staying right there. Turn your work and

5. Slip the first stitch (purlwise so it stays seated on the needle the same way), knit 13 stitches - stop. We are going to turn again. Notice you have four stitches on the left needle. We will be leaving two more stitches behind each time we turn. Two stitches is an arbitrary number - it could be five, it could be ten - it depends on how steep you want your curve to be.

Note: In the T-Top pattern I want to hide my turn between a knit and a purl (we are doing k2p2 ribbing) because the stitches are often a bit looser there anyway. YOU decide where you want to position them because YOU will always be the one adding them to a pattern.

6. Turn, slip the first stitch purlwise. Tighten the yarn. Purl 11 stitches. Stop - there are 4 stitches on the left needle. Turn.

7. Slip the first stitch. Knit nine stitches. Stop. Turn.

8. Slip one, purl seven. Stop. Turn.

At this point there are six unworked stitches at each end of the row. Having done enough short rows for our example, we are returning to regular knitting.

9. Knit all 13 stitches, pulling your yarn as tightly as possible as you knit across the last seven stitches. You should have all 20 stitches on your right needle. Turn.

10. Purl across the row, knitting tightly across the last seven stitches. You have purled across all 20 stitches.

Turn and work an additional four rows in stockinette - knit on the front, purl on the back.

Notice the loose/larger stitches where I turned . . . I can fix them the same way I fix ANY loose stitches in my knitting - by pulling up the looseness and distributing it across the row (washing and blocking will further hide any looseness.)

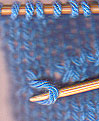
I've hooked the loose stitch with an extra needle and pulled the loose yarn up into a loop. Next I will follow the path of the yarn and move the looseness toward the center of the row by pulling on part of a stitch a little further to the right.

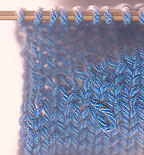
In the next picture, I have "fixed" all the stitches that looked loose. You can clearly see the crescent of short rows - and I don't see any gaps.

Having tried the various short row wrapping methods and acknowledging the difficulty of finding/seeing/picking up the wraps - I would much rather spend a few minutes tightening some stitches than fiddling with when and how to wrap. Not to mention - even with wrapping, there are still loose stitches that need to be tightened. Here is a comparison of all three methods:

Top - Zilboorg's yarn over method from the Knitting Anarchist.
Middle - My No Stinkin' Wraps method.
Bottom - Standard short row wrapping.

All of them had loose stitches tightened to improve the look.

To learn how to do traditional short row wrapping - check your favorite knitting reference book :-) I did not find a lot of great photo/instructions on the net for short row wrapping but here is one - scroll down her page.

Additional references:
How to knit short rows on a neckline.
A great article from Knitty

What am I going to do with short rows?

I'm making the Kniting Pure and Simple V-Neck for my husband who is always looking for things on the ground so the measurement from the back of his neck to his waist is at least four inches longer than the front of his neck to his waist. I did at least six short rows in his back neck area.

In the sweaters I make for myself, I always add a few short rows to the back waist area so I don't need to keep tugging on the back.

Bottom line - Put them where your "curves" are :-)
They make a HUGE difference in how your garments fit.

Questions?

Thursday, March 17, 2005

The Next Tricky Bit

At some point in your pattern, you may encounter something like this:
"At the end of this increase row, cast on to the right tip of the needle 6(or whatever number) of stitches."

In other words, you have just finished a right side knitted row...
Turn your work so you are facing the purl side (back) and do a Knitted Cast On, a Cable Cast On, or the simple E-Wrap cast on to add more stitches to your left (full) needle.

You can find a video of the Knitted Cast On here.

Cable Cast On is the same except you go through the space between the last two stitches. Both are illustrated here.

The e wrap is simply a backward loop on the needle
Video here.


Or you could do what I am going to do, which is get a couple pieces of string, crochet two little chains and pick up stitches along the back of the chains the same way I did my initial casting on.

Why? Because I know I will be doing some kind of neck treatment later and I would rather have these stitches live versus picking them up along the edge which leaves a little ridge.


At this point you may be told to join your knitting into a circle.
Here are the instructions for joining.
Yippee, no more purling!

Your pattern will have very specific instructions on how to set up your markers at this point, but once you have it done, you will be sailing - knitting and increasing until you reach a specified number of stitches.

In the next session we will divide our big tube of knitting into three smaller tubes - the body and two sleeves.

Extra credit - When you reach the magic number of stitches, try on your sweater. Slip half of the stitches onto a spare circular needle or length of string. How does it fit? Is the depth of the underarm comfortable?

Tuesday, March 15, 2005

Have You Finished Your Homework?

Your homewark was to swatch with the yarn you want to use for your sweater, changing needles until you match the gauge given in the pattern you are using. If you have done that successfully, you are ready to START! If not, keep swatching or use the Comments to ask for help :-)

If you haven’t already done so, now is a good time to read through the pattern, even if you don’t understand all of it - we will take it step by step, but it is good to have an overall perspective. For instance, I know the pattern is going to have me knit from the neck down, but, at the end, I will be picking up the neck stitches - see section titled Neckband - and adding a few rows (or a hood) to finish the edge.

Since I am going to work both down and up from my cast on edge, it makes sense to use a cast on that is provisional i.e. has live stitches on both edges, unlike the cast one you normally use (long tail or knitted or loop) which has one finished edge and one edge for the working stitches.

I will do a provisional cast on, in the easiest possible way, by crocheting a chain and picking up stitches through the back of the chain.

I use plain white string for my crocheted chain and chain the number of stitches I need to cast-on PLUS ten stitches. The extra stitches allow me to skip any chains that might be malformed plus not have to use the beginning and ending chains. The knot is at the end of my chain where I cut the yarn and pulled it through the last loop. This is a reminder of which end is the one that will zip off when I am ready to remove it.


Turning my chain over, I use my knitting needle to pick up one stitch through every purl bump on the back (skipping the first and last few bumps.) The back loop looks like a purl bump.


Oooops - the instructions tell me to put markers on in the cast on row - let’s try that again...cast on, pick up two stitches, place marker, cast on 16 stitches, place marker, etc.


Looking at my half circle of knitting the center section is the back of the sweater, the sections on either side of it are the tops of the sleeves, and the two stitches on each end of the needle will grow into the front section(s).

I’m using ring markers - you can use anything you can see - rubber bands, paper clips, twist ties. As you come to them in a row when you are knitting, you simply slip them from the left needle to the right. In this pattern they are marking the places you will be increasing.

What you are doing for the first few rows is shaping the back of the neck - if you look at any shirt, you will see the front of the neck is lower than the back - we are working the extra section of fabric in the back.

Increasing

On Row One you will do you first set of increases - the pattern asks you to increase by knitting into the front AND the back of the first stitch - you are turning one stitch into two stitches. To do this, knit into the front of the stitch. Before slipping the stitch off the needle, place your right needle behind your left needle and knit again into the back of the stitch. Slip original stitch off left needle. There are now two stitches on your right needle.

This increase leaves a little bar (looks like a purl bump) on the right side of your knitting but it doesn’t create a hole. Those of you who are making the Summer Cardigan will be doing a Yarn Over (YO) as your increase because you want a light and airy look. The YO will leave a hole.

Look at the arrow on the right side and you see the little bar that marks where I increased.


Back to the pattern

In the first row, the instructions are telling you to increase before and after each marker AND in the first and last stitch in the row. Turn you work when you reach the end of the row - we will be working back and forth for a few rows before we start knitting circular.

Row 2, which is the inside of you sweater - all you have to do is purl back. Increases are usually done on every other row.

Continue to increase on the odd number rows and purl back on the even rows until your center back section has the number of stitches called for in your pattern.

Next we will cast on stitches at both ends of the needle to add to the front neck section.

To Be Continued :-)

Monday, March 14, 2005

Swatching for Circular Knitting

By now most of you have your pattern, yarn, and needles and are in the process of swatching.

To measure your gauge, lay your swatch flat on a table. Resist the urge to pull it into shape! Lay a ruler on the swatch, lining up the left side of one of the "V"s of your knitting with one of the inch markers on the ruler. DO NOT press down on the ruler or tug on the swatch! Count how many "V"s there are in four inches - if there is half of a "V" at the end count it also. Check the gauge information on your pattern - if you have less stitches per inch, try again with smaller needles. If you have more stitches per inch than the gauge is asking for, try again with lager needles.

Because we are knitting from the top down, the row gauge (how many rows per inch) that is given in some patterns is less important - you will be able to adjust the length as you go. Unfortunately, the only way to change the row gauge is to change yarns.

If you are knitting a cardigan, you will be working in stockinet (knit on the public side, purl on the back) so you can do a flat swatch. Patterns usually give a gauge of "x" number of stitches per 4 inches or 10 centimeters. You will want to knit a gauge swatch of at least six inches by six inches so you will be able to measure a 4x4 section in the middle. The sides and ends of you swatch will be slightly distorted so always make your swatch larger than the area you want to measure.

If you are knitting one of the pullovers, you will need to swatch in the round because you will be knitting in the round. Usually your gauge while knitting every row is different than your gauge for stockinet (knit across, purl back.)There are two ways to knit a swatch in the round. In the first, take your 16" circular needle and cast on enough stitches to go all the way around the needle (some folks turn this swatch into a cap so nothing is wasted :-) Knit 6" and then measure your gauge.

To join your knitting into a circle - Knit once across all the stitches. When you get to the last stitch - keep going in the same direction - you will be knitting the first stitch for the second time (start of Row 2). To do this, you must have enough stitches to fit all the way around your needle. It is also a good idea to put a marker between the last and first stitches so you can tell where your rows begin. Remember to double check to make sure your stitches are not twisted around the needle (like a spiral) when you join the first row. Sometimes there is a longer thread stretching between the last and first stitch of the next row - if it bothers you, you can put it up onto the left needle and knit it together with the next stitch to get rid of it.

To do a flat swatch as if you were knitting in the round, cast on six inches worth of stitches pnto a circular or double pointed needle. Knit across the row. Now, instead of turning, drape your yarn LOOSELY across the back and start knitting at the beginning of the row again. Continue to knit without turning, draping your yarn loosely across the back.

FYI - The easy way to remember how to spell gauge (as opposed to guage) is to spell is just the way it is pronounced - gAuge.