Monday, May 31, 2004

Casting On

Normally I use two balls of yarn and the twisted German cast-on. But this ribbon yarn is slippery so I thought I would cast on in the easiest possible way by crocheting a chain and picking up stitches through the back of the chain.

I use plain white string for my crocheted chain and chain the number of stitches I need to cast-on PLUS ten stitches. The extra stitches allow me to skip any chains that might be malformed plus not have to use the beginning and ending chains. The knot is at the end of my chain where I cut the yarn and pulled it through the last loop. This is a reminder of which end is the one that will zip off when I am ready to remove it.


No matter what size yarn I am using, I use the same string for my chain - what varies is the size of the crochet hook. I use one a few sizes larger than the needles I am going to knit with so the first row will be loose (because I usually knit it twisted.)
Turing my chain over, I use my knitting needle to pick up one stitch through every purl bump on the back (skipping the first and last few bumps.)


We will be knitting in rounds on our circular needle and the instructions alway say to "Join, being careful not to twist the stitches." It can be difficult to see if your stitches are twisting around the needle especially in a furry or fancy yarn so I am going to work the first row FLAT. In other words, I am going to turn my work and work one row in pattern before I join the round.

Note: If you knit this row so the base of the stitches is twisted, you will be able to take off the crocheted chain immediately and the edge will have a looped finish. This is a light, loose edge suitable for scarves and shawls. If you knit the first row so the stitches are formed normally (not twisted), the loops will be "live." In other words, I could slooooowly unzip the string, placing each stitch on another circular needle and then knit them in the opposite direction. Try this for yourself on a little practice swatch - you can cast on ten stitches and do a little sample of each. HOW you knit the stitches to either twist them or not depends on how you picked them up through the chain - you will have to experiment to see what works for you.

The open or live edge is very handy if you want to work cuffs of a sweater or ribbing later. I did a Dale sweater where I cast on at the base of the yoke, did the fancy part and then worked the live stitches downward for the nice long boring part of the sweater. Conventional wisdom will tell you your pattern will be off one stitch on the pick-up-and-knit-in-the-other-direction part but it is not a big deal :-)

Back to our T-Top - once you have knit the first row in pattern (k2p2 ribbing)you will want to stop and count the stitches. Count them twice - it is critical have the correct number for your size at this point. I put a marker at the halfway point because I will need to find it later and I may as well get it marked now while I am counting anyway. Paperclips make good markers when you are counting because you can clip them on anywhere in the row.

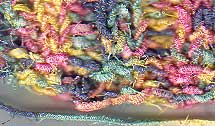
TO JOIN the knitting into a circle - straighten the stitches on your needle so the cast-on edge is hanging down. My cast-on edge is easy for me to see because it is white against the orange yarn. The image on the left is what you DON'T want - a twist.


This a good place to double and triple check that your knitting is not twisting around the needle. If you have lots of stitches on a relatively short needle (I have 160 stitches on a 24 inch needle) it is easy to get twisted. If you are using a longer needle, you will find it much easier to see if the cast-on edge is circling the needle or not. If you start knitting and you DO have a twist,the only way to fix it is to rip back (unless you are making a cardigan in which case you could cut it open and untwist it because the place where you join your round is the center front of the cardigan.) But I know you don't want to cut today so check carefully.

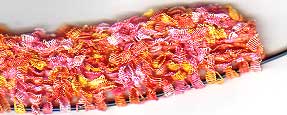
To join - Instead of turning and knitting back, knit the first stitch on the left needle, going right across the gap. You will notice I left my starting tail nice and long - this is so I can sew the gap formed by working the first row flat - later. The tail also acts as my start-of-row marker. You can see the paperclip at the bottom of the right hand picture that marks my side seam.

WHEW! We have finally reached the fun part - knit in pattern until you reach the length specified for your size. This will be the bottom of the sleeve opening - you may want to measure something you already own to see if this is the length you really want. I am short waisted so I will probably make mine shorter than the pattern.

Next - Short Rows or How do I adjust for a larger bust/tummy/back?

It is a holiday and I have the day off so I am going to go knit now - see you later

Questions answered and my swatching ends

Answers to a couple of questions:

Marcy said "The amount of stretch determines fit. The more you have to stretch it to get it to measure the required number of inches, the tighter it will fit against your body."

YES - you are absolutely right! A combination of stretch and measured size will give you the fit you want. The swatch I am going with has very little widthwise stretch (swatch #2) so I will need to be conscious of the finished measurement to insure it has the fit I want (not too tight.)

Someone else ask "Does it matter if we swatch for this in the round or flat (back & forth)?"

Good question - it usually recommended that you swatch the same way you will knit - that is, swatch in the round if the finished garment will be knit in the round. In this case, because the garment will be the same on the right side (RS) and the wrong side (WS), you can swatch flat. On a sweater done in the round where you are knitting every round, if you swatched flat (knit the front and purled the back), your gauge might be different for the knit rows vs. the purl rows so it would be a good idea to swatch in the round.

If any of you want to send in pictures of your swatches, I can post them here (keep the size to under 50K.) I will add a list of the yarns we are using to the sidebar later today.

The yarn I have decided to go with is the slippery orange ladder yarn - made bearable with the addition of a single strand of orange cotton flake yarn. Also, I switched from metal to bamboo needles for less slipping.


I'll be back later to talk about casting on.

Saturday, May 29, 2004

More swatching and the "real" yarn

Filomena was kind enough to send along a link to the yarn used in the pattern. Looking at the photo in the magazine, there was no way to tell it was a tape yarn - I have always appreciated magazines that showed a length of yarn next to the pattern - not that I ever use the suggested yarn :-)

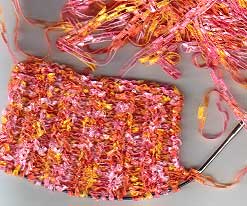
Did a bit more on my second swatch:

Notice how the railroad/ribbon yarn does not pull in as much as the cotton swatch did - this tells me it would make a boxier sweater. The gauge is 5 stitches to the inch on the same needles (unstretched), which makes it a bit too big. On the plus side, it would be a shiny, glamorous, certain-to-be-noticed sweater. On the negative side, notice the big, messy pile of yarn that fell off the ball while I was working with it. And the needles fell out five or six times because the yarn is so slippery.
And the yarn is so shiny it was difficult to see the difference between the knits and purls so I had to keep redoing (OK, I was watching a tape of Starting Over this morning while I was working on this...)Definitely not fun yarn to work with - but I wouldn't mind using it up just to get rid of it before it falls off the balls.

Switched to another swatch - this is a ribbon called Marbella by Trendsetter. It has a bit of body so it is MUCH easier to knit with. Unfortunately, it also does not have any stretch to the ribbing...

Guess it is time to get some shut eye and see how I feel about my swatches in the morning. See you later!

Friday, May 28, 2004

Swatching - Or How I spent my lunch hour :-)

Until today I had been mentally swatching - thinking about which yarn I wanted to use. The only rule I had in mind was that it had to be a yarn I already had - since I DO have lots of yarn. Because this is a short-sleeved summer top (and I live in Arizona where it will be good and HOT any minute now) I knew wool would not be a good choice even though it is what I enjoy using.

My second choice was cotton - I have lots of little thin cottons that I can mix together to get the right gauge. And this was as far as I had gotten in the process until this afternoon when we decided to drive down to Cottonwood for lunch (no Mexican food in Jerome.) Quickly grabbing a US 7 circular needle and a couple of balls of cotton, we hit the road and I cast on 21 stitches for a swatch. As a lazy knitter and infrequent swatcher, I was more interested in getting a fabric weight I wanted than in worrying about measuring the gauge.


According to the pattern, the gauge is "18 sts. = 4 in. measured over 2x2 ribbing, slightly stretched." As Marcy so aptly put it "How do I know if I'm stretching it too much or not enough? Argh."

Looking at my swatch, you can see how the ribbing is pulling the sides in - this is the feature that is going to give this T-Top some shape, making it just a bit body-hugging. If I measure one inch of my swatch without stretching it, I get five stitches to the inch and if I stretching it Ever-So-Slightly, I can match the pattern gauge of 4.5 stitches per inch. Marcy's right - this part of the pattern stinks.

Here comes the MATH part of the planning process - and I'll list it in steps because you will need to substitute YOUR figures:

Pick a size to make - I was thinking about doing the smallest size (listed as a Finished Bust size of 36") which is an inch larger than I am - the pattern is form fitting. You may want a size with more ease.

Check the number of cast-on stitches for your size. If I divide the CO number for my size by my STRETCHED gauge (4.5), I get a finished measurement of 35.6 inches.

Will that fit me? Walks to closet, takes out a close fitting t-shirt and measures the width - 26 inches. Answer - yes, it will fit fine. Again, everyone's preference in ease is different. Think about how the measurements of the garment you already own compare to the garment you want to make. If I was making a loose, comfy Hoodie, I would pick a bigger size.

If I divide the CO stitches by my UNSTRETCHED gauge(5 sts. per inch), I get a finished measurement of 32 inches. Based measurements of the garment I already own, I know 32 inches will work.

Measure and count thoughtfully - if you are off half a stitck on your gauge swatch counting and you are making the largest size, you will be waaaaaay off when you are done.

OK - the yarn would work, but in the final analysis, it is really to heavy for the hot weather sweater I am envisioning. It would make a great cardigan or hat - but not a hot weather tee. So I have started a second swatch in a double railroad yarn - Lana Grossa's Viale Print.


It has potential - but it is late and I am off the bed. Will be working in the shop tomorrow and it should be a busy holiday weekend.

Happy Swatching!

Thursday, May 27, 2004

What is a KnitAlong and How Do I Join?

A KnitAlong is a group of people working on the same project at the same time. It is an opportunity to discuss the minutiae of a project with a roomful of interested companions without boring the rest of the knitting universe. Possible topics of discussion would be: yarn substitutions, problems with understanding the directions, alterations, and finishing.

Knitalongs generally have a definite start date (but you can start early or late :-) and then proceed something like an all-ages 5K race with some sprinting to the finish line, others strolling and chatting, with yet another group wandering off into the forest pursuing other interests rather than finishing. Pretty much the only rule is to stay on topic. And some just join and listen without any intention of actually knitting. I am currently in the Ingeborg Knitalong that Wendy is sponsoring but I am doing a different sweater, Frogner (and since I originally posted this to KnittingNovices, it has gotten even MORE different). They both have a diagonal pattern so they look alike to me.

There are LOTS of Knitalongs (and quiltalongs and beadalongs, etc.) going on all over the Internet. It is a great way to get motivated to start something that would be daunting without a support group. In fact, someone recently compiled a page of current Knitalongs.

How do you join the T-Top KnitAlong? Just let me know you are interested. The easiest way to do that is to make a comment. Click on the Comment link at the bottom of any of the pages. You can comment without signing in, but I need to know your name if you want to be added to the list on the side bar :-)

I want to keep most of the KnitAlong chatter here at the blog to avoid driving people on the list nuts with it - you don't have to "join" anything to read the posts here at the blog and you may knit or not - feel free to comment!

Official Start of the T-Top KnitAlong!

Join us as we work through the T-Top in the August 2004 edition of Knit 'N Style magazine. It is a simple boxy tee-shirt that uses ribbing to give it some shape. Worked in the round, the front is split in the center to create a fold-over collar. Cap sleeves are worked from the top down using short rows (they aren't hard - really :-)

See it here - Lapel T-Top, about half way down the page on the left.

You will need a copy of the magazine to knit along with us - it can be found at knitting shops and bookstores or you can order it directly from the publisher.

To ask a question, click on the Comments link at the bottom of this post. I will put answers to the most frequently asked questions on a FAQ page after we get rolling.

Here is a little button you can add to a web page or blog if you are knitting along:


A few thoughts before starting:

The gauge is 18 sts = 4 in OR 18/4 = 4.5 stitches to the inch on size US 7. The yarn used in the pattern is Aurora/Ornaghi Filati Giglio. You may use any yarn and needles you want as long as you get THE SAME GAUGE. If someone comes across a link to the actual yarn I would be happy to post it here but I know I will be using something I already have, probably a combination of little 5/2 cottons since this is a summer top.

4.5 stitches to the inch is worsted to heavy worsted weight like Cascade Sierra, Plymouth Fantasy Naturale, Noro Kureyon, 1824 Cotton, or Reynolds Saucy. I got these names from the Patternworks catalog but again, you can use any yarn you want as long as you get the correct gauge.

How do you find out what gauge you are getting? Here are a few articles on gauge:
EarthGuild I happen to like this one the best.
KnitaBit
Martha Stewart :-)

Enough for now - I'll be back!